Looks like a fun one, good luck!


Looks like a fun one, good luck!
Looking for engine # 6208151
'74 RS 3.0 Replica
'70 911E Bahia Red (SOLD)
'71 911 S/T Replica 2.3 Twin plug BEAST (SOLD)
Australian TYP 901 Register #78
Early S Registry # 1076
"Looks like a fun one?"
this guy has balls of solid rock!!
but i fully expect that he will inspire a number of other guys toward creating an 'outlaw.' i wish him nothing but sunshine and tailwinds.
Interesting and veeeery challenging.
Early S Reg. #1263
72´911E
95´993
02´986S
I know 'the mad scientist' can do this
Early S Registry member #90
R Gruppe member #138
Fort Worth Tx.
Do you have any body alignment jigs on the car yet?
Also, didn't Dave B. (TRE) do a very stiff car up for somebody?
Woo-HOO! . . .
. . . another Resurrection Thread
Too bad that you're started all this in the Technical Section Info, but . . .
. . . oh well
I'm In!
Thanks for the vote of confidence everyone. I am having fun. Except where my hands and arms are sore after drilling spot welds for 3 hours on Sunday. btw, my rear seat panel is in place. It fits quite nicely if I do say so myself. I am currently on track for some wet media blasting next week at which point I can consider tacking in a few panels to hold placement. Then it will be clecos and plug welds to the rescue!
So what's wrong with the technical section?Seems like the best place to put it since I have basically cut the middle of the car out. Just as technical as a question about the correct finish on a particular part. Get Chuck to create a build/restoration section and we can put all these full car projects there.
I do not currently have the tub braced. It is sitting level on the longitudinals with no suspension or drivetrain. The stress on the tub is minimal and the sections that are removed are not structural to the car. Currently I do not think additional bracing is needed. However, once I get to the point where I have to pull the center tunnel for repair and most of the floors along with it I will brace the tub with X's across the door openings and connecting the center of the passenger compartment. Honestly, I don't think its needed but will do it anyway.
I admit that replacing an entire rear seat panel section is so much easier than cutting and welding and finishing small patches.
I am working on a more extensive update that I will put up in a day or so. It involves several sections of new sheet metal.
1971 911T SWT - Sun and Fun Machine
1972 911T - "Minne" painted and undergoing assembly.
Excellent Jamie, the start of of another hill country fun car!! Looking forward to future updates.
65 356SC Dolphin Gray
66 912 Green
69 911E Tangerine
72 911T GP White
72 911T Aubergine
72 911T Lilac
72 911S Black (voodoo)
86 911 GP White Targa (now sons)
90 964C4 Black Targa
94 964C2 Black Coupe
08 GT3 Speed Yellow
Nothing's 'wrong' posting here . . .Originally Posted by jpnovak

. . . I just think that you'll get more Readers if you post in the General Info section --- that's all
Carry on!
Week 2:
So despite some work travel I managed to get some progress done. First I will address a few questions.
Currently the tub is not connected with additional bracing. Why you ask? The structural parts of the tub are not rusty and the entire outer "cage" is fully supporting the tub. The tub is sitting level on my lift without any additional load of suspension or drivetrain. These cars are pretty stout and I have not yet cut out any part of the tub that I consider to be structural in any way. There will be a time for bracing but now is not the time. I could not get my panels in place if I closed the passenger compartment with bracing.
Plasma Cutter. Mark, I used to have one. I never used it. I think the cut-off wheels are more precise except for tight corners. Mine also left a ragged edge that I still had to clean up with a grinder. That was 14-15 years ago. Maybe the home use versions are better now. Bring your's down in March and I can borrow it for a few weeks.
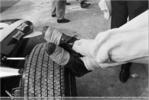
Time for a little game of "what is this?" or "where does this go?"
Give up? Let's see. Three holes, one larger than the other. One stud. Lots of crust. Well. It came out of this...
Yes, that is the pedal cluster. Err, I guess I should say this was the pedal cluster. Its a bit rusted. I have NEVER seen anything like this. Oh, the part in the first pic? That was the back edge of the pedal cluster. The stud attached to through the tunnel to the master cylinder. It went into the trash. Add that to my list of parts to buy. Oh yeah, that sheet metal part sticking forward? That is the floor reinforcement for the pedal cluster. It also locates the gas pedal. This is what you get when you cut this out of the car. This was the third dustpan. Morrie was there to help sweep up the pile.
Scarey!!! Well to some. I expected it on this project.
So Saturday I kept cutting. I took out the front pan and also the heel panel. These are currently rough cuts needed before I start fitment.
Why did I cut these out? Well besides the rust I finally have something shiny to take pictures of. New sheet metal! Thanks to Mike at Restoration Design for quick packing and shipping. They arrived while I was away for a work trip. Thanks to Fedex for having routine Saturday delivery.
At lease the new panel looks much better than the old. You can see how bad the heel panel was in the comparison.
This is the first test fit. I will have to massage a few corners and work the top edge where it ties into the seatpan but first impressions are positive.
Sunday was spent drilling spot welds. If you look at previous pictures in the post you will see that I Have a cut panel from another car. This is great except for one thing. There are a gazillion spot welds around the perimeter and I had to drill out every single one of them. That really sucked. You have to pay attention to what side of the flange you are drilling such that you can weld the panel in correctly.
My method was to clean off undercoating, seam sealer and paint to locate the spot welds. Then I center punch with a prick punch. I do not use a spring loaded punch here as they just don't have enough force to make a nice divot. Then I used a $4 HF special spot weld cutter. I bought several of them because the last time I used one I broke off a lot of teeth. This time was different.
I used ONE and only ONE spot weld cutter on the entire panel. I could not believe it. The only thing I don't like is that the cutter is too large. btw, keep the center pin lubed so that it is free to move in and out. Then you make sure to use a corded drill. My cordless battery power did not last very long here.
After a while you end up with a pile that looks like this. This is only half of the pile. The smaller bits are the remains of what used to be the rear inner fender well. The large section is the external sheet metal across the engine bay that also contains the lower rear window seal lip.
Here you can see the edge of the panel. Yes, I will have to plug weld every one of those holes. That will suck. Not as bad as finishing all the welds though.
Interesting to note that the center of the rear deck panel has a box section to give rigidity. I knew this was there but its good visual aid for those who did not.
To rest my hands from drilling spot welds I got out the grinder and cleaned up the flanges from cutting out the old rusty rear deck panel. Then, Of course I had to test fit the new one.
Like a glove.
I still have to clean up the flanges on the green panel but I am only come clecos and spot welds from having it attached. That will have to wait a few weeks while I organize some mobile wet blasting on the tub. I can't wait for clean shiny metal on the whole tub.
Next step is to trim and fit the front pan.
1971 911T SWT - Sun and Fun Machine
1972 911T - "Minne" painted and undergoing assembly.
 Posting Permissions

 Reply With Quote