Page 5 of 11 FirstFirst ... 34567 ... LastLast
Results 41 to 50 of 109

Thread: Benny and the jets - a coming of age tale about a '77S rebuild

  1. #41
    Senior Member obscene's Avatar
    Join Date
    Sep 2015
    Location
    PA
    Posts
    161
    Quote Originally Posted by GT3DE View Post
    Since the hood and bumper are both fiberglass, why not use fiberglass LH fenders?
    It's certainly something I've been heavily considering lately. In my initial research, it seemed like many people had a negative opinion on fiberglass fenders. I don't know if that's just a stigma though..

    Really I've just been going back and forth about time. When I started this project, cash was worth more than time. Now that my daughter is here, it seems like that relationship is shifting the other way. Is it really worth it to sink another 100 hours into body work? I'm not so sure anymore. $3,000 buys new re-pop fenders, but more importantly, puts me closer to being back on the road....
    Benny and the jets - My '77S Rebuild Adventure

  2. #42
    Senior Member obscene's Avatar
    Join Date
    Sep 2015
    Location
    PA
    Posts
    161
    "there's a present for you out in the garage" - mrs. obscene


    happy holidays!
    Benny and the jets - My '77S Rebuild Adventure

  3. #43
    Senior Member obscene's Avatar
    Join Date
    Sep 2015
    Location
    PA
    Posts
    161
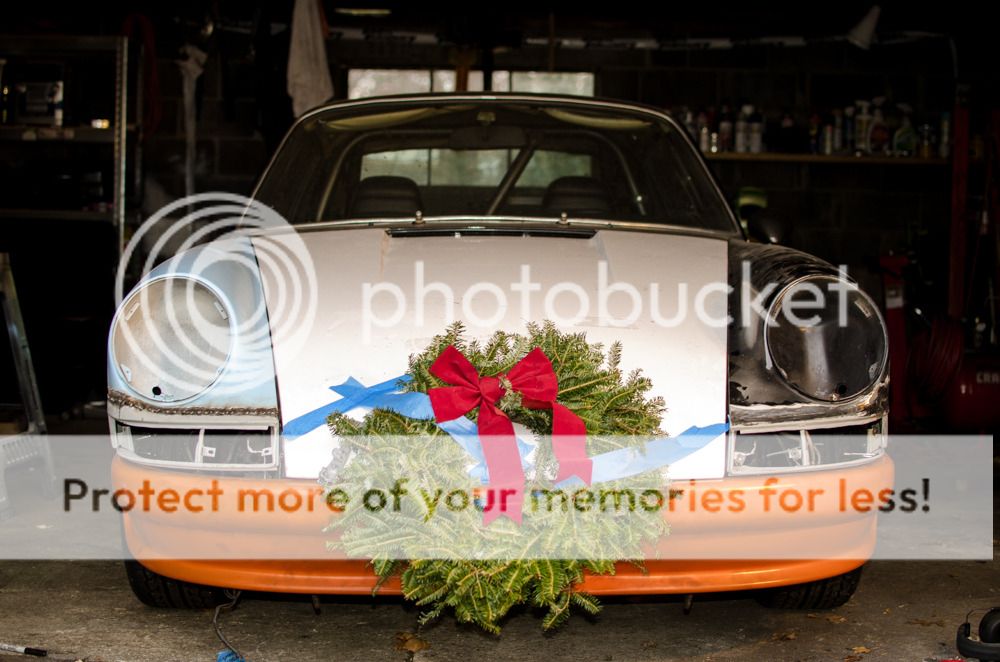
    It's a Christmas miracle!


    Santa came early in the form of two brand new longhood fenders! After careful consideration, I made the decision to source a pair of ready-to-go fenders rather than invest another 100 hours of labor into the conversions. I was lucky to get these for a fairly decent price so in the end it didn't hurt too bad. Plus there's a chance I can still sell the conversions. At the end of the day I'm just happy to have knocked months of time off this project. Merry Christmas, everyone!
    Benny and the jets - My '77S Rebuild Adventure

  4. #44
    Senior Member obscene's Avatar
    Join Date
    Sep 2015
    Location
    PA
    Posts
    161
    Please accept my apologies for the following series of low quality photos and limited explanation of progress and projects. I've recently been a victim of sinus surgery so work on the car has all but stopped completely while I Netflix & pill. In my last post, I highlighted some of the areas where the rear bumper fitment needs adjustment. Before I hack the whole thing to bits, I wanted to see if I could use a bit of heat to reshape the bumper guards into fitting tighter against the turn signal housings.

    If you look at the before picture, the bumper guard was kind of sunken in where it should have been nice and straight and parallel with the opposite edge. Using my heat gun, I was able to get the bumper somewhat flexible and placed a small block of wood inside the guard to hold the shape. I'm going to let this sit for a few days to see if the shape stays.


    Next, I brought my cracked H4 headlight inside to replace the broken lens. The housings are held together by a series of metal spring clips which have been known to specifically target eye balls should they slip from under your finger. Luckily I managed to get the whole assembly back together with only having to check the internet once.


    and that's it. I know right? Hopefully next time we're back in the garage doing rad things.
    Benny and the jets - My '77S Rebuild Adventure

  5. #45
    Senior Member obscene's Avatar
    Join Date
    Sep 2015
    Location
    PA
    Posts
    161
    hoping to get a formal update together soon. until then..

    Benny and the jets - My '77S Rebuild Adventure

  6. #46
    Senior Member obscene's Avatar
    Join Date
    Sep 2015
    Location
    PA
    Posts
    161
    This one is definitely a bittersweet update for me. Since the last update, I've managed to squeeze a few evening sessions in with the car and have been focusing on mounting the rear bumper, getting the body gaps as good as possible on the driver's fender, and generally trying not to freeze my ass off. Saturday's unseasonably warm weather meant it was a great opportunity to get both fenders off and sprayed with some undercoating.


    I really like this stuff because it sprays nice and thick, and looks brown while wet making it easier to spray multiple coats. I'm hoping it's enough to protect against stones getting kicked up from the tires.

    I also drilled some holes into the rear bumper and attempted to fiberglass in some captive nuts. I must have messed something up though as they immediately broke loose as soon I tested threading a bolt. Fortunately my little girl hands are slim enough to be able to hold the nut while tightening from above so no worries for now. The rear bumper fitment is coming along, and I just need to glue the seal in place before doing some final mock up.


    Unfortunately that wasn't end of my mess ups. While working on the turn signal fitment I tightened the screw just a little too tight resulting in a nice crack - an expensive lesson for sure.


    I was pretty upset about cracking the lens, but now it just seems stupid. Saturday afternoon I received a phone call from my parents letting me know that my grandfather had suffered an unexpected heart attack and passed away shortly after. He was a major inspiration in my life and always made time to ask how my various car projects were going. I think he had a particular interest in this project because the accident happened on my way to visit them and he'd been a deer hunter for most of his life. Although he did get a kick out of my stupid old green VW truck, mostly just for useless it was.

    I wrote this farewell salute last night and thought I'd share. We can't keep our loved ones forever, but hopefully the things they've taught us can live on.

    My grandfather was the type of man who worked hard every day to provide for his growing family, fought for our country overseas, had tattoos and piercings and motorcycles before it was cool, wore a bandana and ponytail, loved Al Bundy, setup a tent in the backyard every summer for my cousins to effectively become my siblings, and perhaps my favorite - he taught me how much fun it is to take things apart and put them back together. I'll miss you, Poops. Not a typo; even his nickname was badass.

    Benny and the jets - My '77S Rebuild Adventure

  7. #47
    Senior Member
    Join Date
    Feb 2003
    Location
    Corpus Christi, Texas
    Posts
    192
    That's a great pic and great memories!
    Jason Burkett
    Paragon Products
    www.paragon-products.com
    Early 911S Registry #428
    R Gruppe #375
    1973 911S
    1972 911T
    1974 914 Limited Ed. Blk/Yellow
    1989 944 Turbo
    1993 968 Turbo RS
    1967 Shelby GT500
    1968 Shelby GT500 Conv.
    2010 VW GTI, Daily Driver

  8. #48
    Senior Member obscene's Avatar
    Join Date
    Sep 2015
    Location
    PA
    Posts
    161
    Hey!!!

    Spring has sprung, and you know what that means: another small update where I combine a month's worth of 15 minute work sessions into one small ramble! Just like digging to China though, every shovel of dirt counts and eventually (hopefully) you get there.

    When we last left off, my attention was focused on fitting the rear bumper. As you may recall, the fiberglass replacement bumper has been a project in and of itself with many hours already devoted to getting the fitment better. It's by no means perfect now, however, it's close enough to work with given the remaining timeline and budget.


    Things started off with cleaning and prepping the rear end of the car. Nearly everything was removed and ready before, but I wanted to treat any rust prone areas and nail down my strategy for mounting the bumper. I'm going to be using a technique I picked up on Pelican, where you use the existing holes at the bottom of the quarter panel plus a few new holes drilled into the bottom of the tail light frame.

    The warmer weather also allowed a special treat: baby's first garage hang with dad.


    With baby safely repurposed back inside, I went to work getting the bumper trimmed down further and ready for paint. If you look along the bottom edge, you see a bit of heat warping. Hopefully more trimming and some reflective foil will keep that from getting worse.


    Prepping the bumper seemed to take forever as all over the surface there were tiny imperfections that needed fiberglass or filler. After a few days though everything seemed straight so I laid down a few coats of rustoleam. The aerosol paint obviously isn't my favorite option, but should work well for this phase of the car. In years to come I'd like to replace the fiberglass bumpers for steel, and give the full car a proper respray.


    This brings us up to this past weekend. Once everything had dried, I was able to flip the bumper over and begin applying the heat reflective foil. This stuff was really easy to work with and took up the contours of the bumper very nicely. The adhesive backing seemed pretty tough too so I'm feeling good, at least for now, about protecting the bumper.


    Once again, I was fortunate to have some company out in the garage even if she made herself comfortable in my new recaro seats. My leather tombstone seats are in great condition, but I couldn't say no to a set of old school recaros. The plan for these is to recover the center sections over the next few months.


    Back to the action, I was hesitant to use glue on the bumper seals so I picked up some outdoor strength double sided tape. The seal gets sandwiched between the quarter panel and bumper so I guess it doesn't need to be too strong, I just felt much for comfortable working with the tape. After mocking the seal into place, I applied the tape and used some painters tape to keep everything in position until I was ready.


    Not surprisingly there are no pictures for the next hour or two's worth of effort. Positioning, holding, re-positioning, fumbling with screwdrivers, re-positioning, and holding doesn't allow for much documentation. If I learned anything, it was:

    1. Screws with a hex head are infinitely more appropriate for this than screws with a philips head.
    2. Remove the oil tank and don't hold a grudge against the passenger side.

    Things finally came into place though, and I was treated to the first glimpse of the orange on black look. I tossed the taillights in temporarily for photos, but they need to come back out for re-wiring soon. Overall, not terrible but not great. The paint isn't perfect. The fitment has gaps. I'm satisfied though, and we're now one step closer to getting back on the road.


    oh yeah and I painted the fuchs black. fuch me right?
    Benny and the jets - My '77S Rebuild Adventure

  9. #49
    Senior Member draab29's Avatar
    Join Date
    Jul 2010
    Location
    Malvern, PA
    Posts
    228
    Looks great!
    Dave Raab
    O6 R702 ESR1852
    1986 Carrera

  10. #50
    East Coast
    Join Date
    Jun 2009
    Location
    Philadelphia, PA
    Posts
    443
    Step by step its starting to come together...I like the black Fuch's, they look "right" with your black/orange hot rod theme.....besides, fuch it, it's your car, do what you like..
    Last edited by MikeM; 04-06-2016 at 04:21 AM.

    OG3
    RG715

Posting Permissions

  • You may not post new threads
  • You may not post replies
  • You may not post attachments
  • You may not edit your posts
  •  

Message Board Disclaimer and Terms of Use
This is a public forum. Messages posted here can be viewed by the public. The Early 911S Registry is not responsible for messages posted in its online forums, and any message will express the views of the author and not the Early 911S Registry. Use of online forums shall constitute the agreement of the user not to post anything of religious or political content, false and defamatory, inaccurate, abusive, vulgar, hateful, harassing, obscene, profane, sexually oriented, threatening, invasive of a person's privacy, or otherwise to violate the law and the further agreement of the user to be solely responsible for and hold the Early 911S Registry harmless in the event of any claim based on their message. Any viewer who finds a message objectionable should contact us immediately by email. The Early 911S Registry has the ability to remove objectionable messages and we will make every effort to do so, within a reasonable time frame, if we determine that removal is necessary.