Page 48 of 72 FirstFirst ... 38464748495058 ... LastLast
Results 471 to 480 of 711

Thread: 911S Resurrection Not Restoration

  1. #471
    Member
    Join Date
    Jul 2015
    Location
    CT and NY
    Posts
    57
    Here are the rear engine mounts that didn't fit the fixtures, the body was true at the torsion tube and the front was as square as it could be on the front, but the front couldn't be bolted down due to a front pan not being installed "Celette True." He also wanted the car checked quickly and I could tell it was going to be an immediate "failure," so the front not being perfectly bolted down wasn't big deal, the whole thing was kind of mess is what we found. The torsion tube area fit as pefectly as it could, so the rear end damage can be detected properly. This sort of damage would be tough to diagnose without a Celette, it could be done I guess, but the precision and design of the Celette allows for highest quality repair in my opinion.

    By the way, those are Celette factory original fixtures, they are probably 50 years old, but they were used relatively lightly, there's a cool story that goes with those fixtures and a lot of racecars on the east coast. Name:  140.jpg
Views: 585
Size:  441.6 KBName:  150.jpg
Views: 585
Size:  550.0 KB
    Last edited by David Liam; 06-02-2020 at 07:14 AM.
    Runge Eleven
    david@rungeeleven.com
    www.rungeeleven.com
    Porsche 911 Corrosion/Collision Repair Specialist

  2. #472
    Senior Member bob joyce's Avatar
    Join Date
    Aug 2017
    Location
    el sobrante ca.
    Posts
    1,165
    David.... your post is a great way to show just how useful the celette is. My guess is that your example car was "T boned" on the passenger side rear quarter panel area. .... the engine and transmission weight wiped the rear end back in the direction of the impact.... just my guess... it takes common sense but it is not that hard to level the car and find center line, front to back.. obviously when doing this on your example car, you would be mislead if you started with centering off of the engine mounts. (and knowing the damage history is not always available). the steering rack, trans mounts and engine mounts are the three important stations to use to "center" the car. If these three points line up for center line, great. In your example car, if you did not know the damage history, you would have assumed the trans mount was out of line. at lest that is what it would have looked like, initially. So that shows the limitation of the string and plum bob method. If you knew of the previous damage. you might have used the steering rack and trans mounts and found the engine mount difference..
    So the celette is a great tool, and eliminates bad assumptions... the string and laser method will show if a car is damaged/out of line. but diagnosing why and were takes a lot of analysis.

  3. #473
    Quote Originally Posted by David Liam View Post
    Hello,

    I was reading through the earlier posts. I am sure there are ways to do it with lasers and plumb bobs, but I have a professional Porsche 911 Metal Shop and I went all in with Celette repair benches and fixtures. I repaired early 911s on jack stands as a teenager and in my early twenties, so I can fully appreciate what a Celette offers.

    I have a great example I can show you. Someone wanted to build a $200-300k hot rod, but wanted the body checked before investing all of that money in it. It was stripped down, so it loaded onto the Celette easily. The issues were easy to see.

    The torsion tube mounted well, it was "true" but the rear was pushed over. There was also noticeable damage to one of the rear bumper mounting brackets where the impact was taken. The quarter panel somehow seemed unharmed, but it was 4-5 years ago, so I don't remember it perfectly, but I do have pictures I can show.

    Issues to look for in photos:

    -Replacement front pan was installed at some point, but didn't fit the Celette, very common, I find most front pans done without a Celette never fit a Celette (stoddard makes a front end jig, but I have noticed in front end collisions, the two rear mounting points (4 total for both sides) for the front suspension get pushed back, the jig aligns off of the back mounting points, so if this front end only jig is used after a collison, the front pan will go in misaligned. I have custom made pulling equipment to correct damage that pushes back the front suspension mounting points. The farthest back I have ever corrected is about 3/4'', any more and the damage is usually too severe and a new floor area and inner fender work is usually required)

    -The rocker panels didn't fit the rocker panel jig, I think the car took a hit on the left side at some point, maybe a different collision than the one that bent the rear. That side of the car just didn't fit and I think I remember noticing funky welds on the outer rocker and thinking "yup, that's not going to fit, get that out of there or we can't mount the car."

    -Rear shock towers are pushed over, I believe to the right, that's from the hit to the rear. Either the car got hit or it spun and crashed into something. The bumper took the impact and transferred that energy throughout the rear end. One other thing to add about this location is that I have noticed it is not very precise, I notice a lot of variance in this location with "perfect" cars. My guess is there was a lot of tolerance given there at the factory when the car was produced because precision at this location isn't very crucial, it just holds a shock.

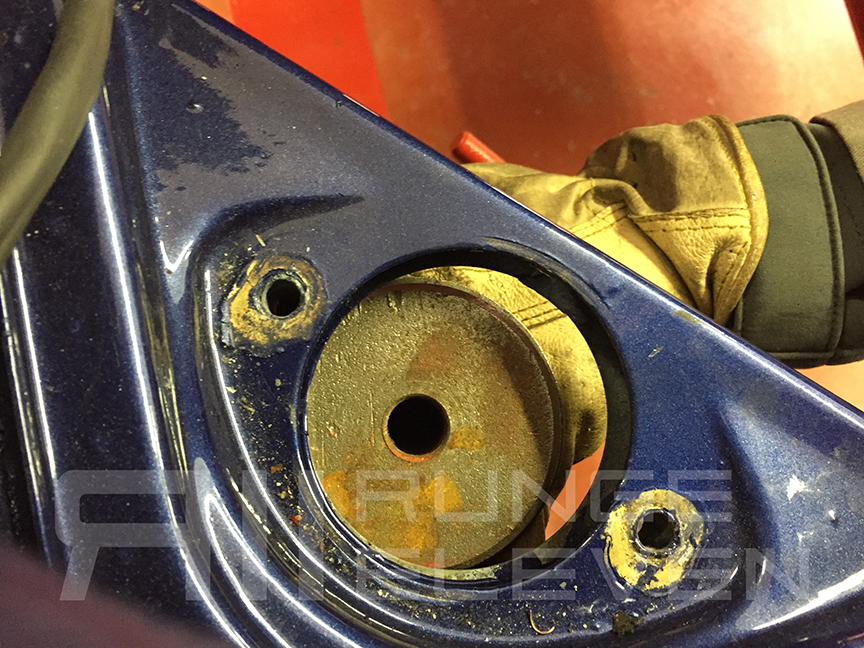
    -Rear engine mounts are pushed over even more than the shock towers, again from the rear end collision. The jigs didn't align with the engine mounts. If correcting, pulls would be performed until that engine mount jig fit perfectly in the engine mount. The rear end is often pushed up or down as well, so the pull has to be done in three dimensions, not just left or right. I use a pulling dozer along with a bunch of smaller hydraulics in cases like that. Nothing is ever very straight forward with pulling, it's kind of an art and a creative can do attitude is key. Things are often worse than they first appear.

    I ended up not repairing that car, but my diagnosis was crucial to their decision making process.

    Feel free to ask questions or ask me to clarify anything. There are a lot of pictures on my website as well, www.rungeeleven.com

    I also post on instagram here and there, some more random "in process" or whenever I feel like posting pictures, search for "rungeeleven"

    Facebook too, but that's linked to my instagram, so it's the same content.


    Attachment 524954
    Attachment 524955Attachment 524956Attachment 524957Attachment 524958Attachment 524959Attachment 524960Attachment 524961Attachment 524962Attachment 524963
    It has taken me a while to fully read the message and understand it. Thank you very much for the great explanation (I have this topic very green and I don't know everything). Surely you will receive a message from me when I advance a little or my doubts light up! From my point of view I hope that the car only has damage to the front ... The car has been running for several years with the effect of eating tires but nothing more according to my father. He was unaware of the coup until recently, although certainly, when he went to buy the car in Las Palmas, the mechanic who accompanied him told him that it was touched but it was fine ...
    Concerning the great explanation. It has helped me understand basic things, I need to get a "theory" of the accident, as I think it was ... Since I think, I am not going to get a clear account of the accident. I think I have already told how I think the accident was, if someone wants to tell their vision by looking at the photos, I will be happy to hear it! It will be interesting since I understand that to go through a celette you have to have a good perspective of the matter to shoot in the opposite direction or as you say, in more dimensions. Where I have seen appreciable damage is on the passenger floor, the front left battery area and also the front tray on that same side, on the pilot's side I have found nothing for now except the damage to the moon mount. In that place, I thought for the first time that the car had suffered a serious accident since it deduced that at that point a chain was put to stretch that pillar. I would like to know and maybe I can get someone to repair that accident. Time to time.
    by the way, thanks for telling me about your work, out of curiosity, how old are you right now? Obtaining this material, I suppose, would have been part of a life project ... Salds!

    +

    Certainly, the chassis work will be left to a professional but I would like to take the most accurate measurements possible before. I will pass the plumb line in the following points although they do not give me a real vision of the car

    +

    Last edited by _gonbau; 06-04-2020 at 02:37 AM.

  4. #474
    Hello, I would like to ask if the *rearsway*was painted in the color of the body? Or black?
    I have found base color yellow but above the yellow the bar was painted black
    +
    Name:  104289110_2872785169498712_20612869467948377_n.jpg
Views: 460
Size:  134.0 KBName:  IMG_20200610_215623.jpg
Views: 438
Size:  54.0 KBName:  IMG_20200611_202320.jpg
Views: 441
Size:  107.1 KBName:  IMG_20200610_215455.jpg
Views: 432
Size:  78.1 KBName:  IMG_20200610_220005.jpg
Views: 445
Size:  77.9 KB

    +

    perform the rear stabilizer bar. I phosphatized it and then gave it the black primer. (The observation about this part is that in the factory it was painted the color 117 body color *) I also restored the supports. Think about filing them and leaving them smooth but I like more that they look "like that ...". One of the diameters was found to be smaller than the other, and we know that the bar touched at some point. I understand, the smaller diameter washer is the "original" of the vehicle. Also check the straightness of it, it has a small deviation and some indentation marks.
    I was also cleaning the chrome of the hood headlights with a satisfactory result ... Surprising what a sandpaper does and a little patience. Also make the floor of the co-pilot. With transparent epoxy (excuse the sacrilege as always) but from my point of view I will be able to preserve the car better apart from what I like more "in metal". Black is anticaloric paint, the same one that I have put on the handbrake and the gearbox. This decision was made because the "shiny" black does not take much with the idea I have of the car.
    regards

    Name:  IMG_20200612_191632.jpg
Views: 419
Size:  140.7 KBName:  IMG_20200613_172552.jpg
Views: 411
Size:  131.2 KBName:  IMG_20200612_140505.jpg
Views: 404
Size:  119.5 KBName:  IMG_20200614_145023.jpg
Views: 404
Size:  65.3 KBName:  IMG_20200614_152053.jpg
Views: 405
Size:  97.0 KB
    Last edited by _gonbau; 06-14-2020 at 11:25 AM.

  5. #475
    Hello, I would be interested to know if there is information about the chassis 9112301566 in the forum. I have used the search engine and I have not found anything referring to it. If you google an article from porschecarhistory but nothing else. Cheers
    Question: https://www.early911sregistry.org/fo...at-is-this-car
    Last edited by _gonbau; 06-20-2020 at 06:37 AM.

  6. #476
    Hi, can someone clarify if this green cable with blue stripes corresponds to the electrical installation of the brake lights? I can't find that cable in the diagram, if the others. I attach some photos of the work of these days. Salds

    Name:  IMG_20200621_222724.jpg
Views: 373
Size:  45.6 KBName:  IMG_20200620_140540.jpg
Views: 352
Size:  132.0 KBName:  IMG_20200621_212629.jpg
Views: 352
Size:  103.5 KB

    ++found, I was looking at the wrong diagram.

    +

    Name:  IMG_20200622_193833.jpg
Views: 303
Size:  112.9 KBName:  IMG_20200622_193855.jpg
Views: 331
Size:  107.8 KB

    With the cleaner sheet, damage is observed in this part of the car! Hammer and wrinkle observed. I think he didn't even repair himself after the "accident", I say this because of his condition.

    Name:  IMG_20200622_193858.jpg
Views: 326
Size:  113.0 KBName:  IMG_20200623_213204.jpg
Views: 266
Size:  58.8 KBName:  IMG_20200623_213320.jpg
Views: 304
Size:  115.0 KBName:  IMG_20200623_210227.jpg
Views: 299
Size:  127.1 KBName:  IMG_20200623_224144.jpg
Views: 303
Size:  58.7 KB

    With the contrast of black you can see the details

    Last edited by _gonbau; 06-25-2020 at 12:53 AM.

  7. #477
    Hello, I am interested in obtaining the location of a post that talked about the weights of the bumpers and the types of construction materials. I can't find it even using the search engine. Does anyone remember the post where the images and the explanation were shown? Greetings and thanks.

  8. #478
    that black stripe. Does the car have a painted black stripe when it was yellow or does the black stripe correspond to a preparation before giving the yellow paint? I have not been able to see this black line in images of restorations. I don't know if it has to do with the stoneguard but it is one of the first layers of the vehicle. Limit the underbody protection zone? That black line is present in all 911 manufactured or is it a paint scheme?
    on the other hand I attach a layer comparison image. The most expert will be able to draw their conclusions if they do not already have them and some help with this would be useful. The image corresponds to a piece of paint that you remove from the "water trigger" on the front.
    According to my observation:
    A lighted yellow is observed and then a lighter yellow. Looking at the photo we can get the order of the paint layers. The lit yellow was the "original"? It looks like the water trigger didn't come apart when it repainted yellow. What should I understand about the image? Is that lit yellow the original that corresponds to 117?

    Name:  IMG_20200629_143024.jpg
Views: 281
Size:  80.1 KBName:  IMG_20200629_143222.jpg
Views: 266
Size:  40.7 KBName:  IMG_20200629_143319.jpg
Views: 270
Size:  176.7 KBName:  IMG_20200629_142944.jpg
Views: 263
Size:  73.5 KBName:  IMG_20200629_143003.jpg
Views: 259
Size:  45.1 KBName:  IMG_20200629_142940.jpg
Views: 263
Size:  52.1 KBName:  IMG_20200629_142931.jpg
Views: 266
Size:  53.7 KB
    +
    Name:  IMG_20170224_1644241510403507.jpg
Views: 262
Size:  77.5 KB
    ?¿¿?
    Last edited by _gonbau; 06-29-2020 at 07:05 AM.

  9. #479
    According to the weight that I have at home (very little exact), the rear bumper with its modification S / T type weighs about 2kg. I understand, is this piece of normal weight?
    Attachment 527397

    I would also like to ask how much the back cover weighs. I remember growing up leaning on it and watching it bend and then return to its place. I understand this does not mean anything but I would like to have annotations. I have thought about looking at the parts store and seeing the weight but I do not know if they are manufactured to the same standards (I doubt it) and possibly the weight differs. I hope not to disturb health!
    I have observed and these days I will work the bumper. My intention is not to apply putty on top of the seams (that's how I think it was in the beginning)

  10. #480
    Senior Member bob joyce's Avatar
    Join Date
    Aug 2017
    Location
    el sobrante ca.
    Posts
    1,165
    hello Baudett ... In your post on 6/21/2020. the 10th picture. the damage appears to have come from the bottom in a way that ma be the car fell off of floor jack and landed on something below it. You see the detail of 2 parallel indentations at 2 different levels of the floor. i would like to see a picture of the outside of the wheel house. looking at wheelhouse from inside does not show evidence of impact that would relate to shown damage on floor..

Posting Permissions

  • You may not post new threads
  • You may not post replies
  • You may not post attachments
  • You may not edit your posts
  •  

Message Board Disclaimer and Terms of Use
This is a public forum. Messages posted here can be viewed by the public. The Early 911S Registry is not responsible for messages posted in its online forums, and any message will express the views of the author and not the Early 911S Registry. Use of online forums shall constitute the agreement of the user not to post anything of religious or political content, false and defamatory, inaccurate, abusive, vulgar, hateful, harassing, obscene, profane, sexually oriented, threatening, invasive of a person's privacy, or otherwise to violate the law and the further agreement of the user to be solely responsible for and hold the Early 911S Registry harmless in the event of any claim based on their message. Any viewer who finds a message objectionable should contact us immediately by email. The Early 911S Registry has the ability to remove objectionable messages and we will make every effort to do so, within a reasonable time frame, if we determine that removal is necessary.