Page 2 of 3 FirstFirst 123 LastLast
Results 11 to 20 of 28

Thread: Rear parcel shelf trim

  1. #11
    member #1515
    Join Date
    Mar 2009
    Location
    San Antonio, Texas
    Posts
    4,261
    Indeed, Bob is correct, I went back and looked at a picture of mine bare and the brackets are welded to the bulkhead. Sorry for the error, should have checked first.
    David

    '73 S Targa #0830 2.7 MFI rebuilt to RS specs

  2. #12
    Senior Member Simonjjb's Avatar
    Join Date
    Dec 2013
    Location
    Connecticut/Florida
    Posts
    1,385
    If it gets really bad you can buy replacement brackets
    1968 911L Coupe - Golden Green
    1971 911S Coupe - Gemini Blue
    1973 911S Targa - Signal Yellow
    1974 914 2.3 - Sunflower Yellow

  3. #13
    Senior Member
    Join Date
    Sep 2018
    Location
    Northern California
    Posts
    312
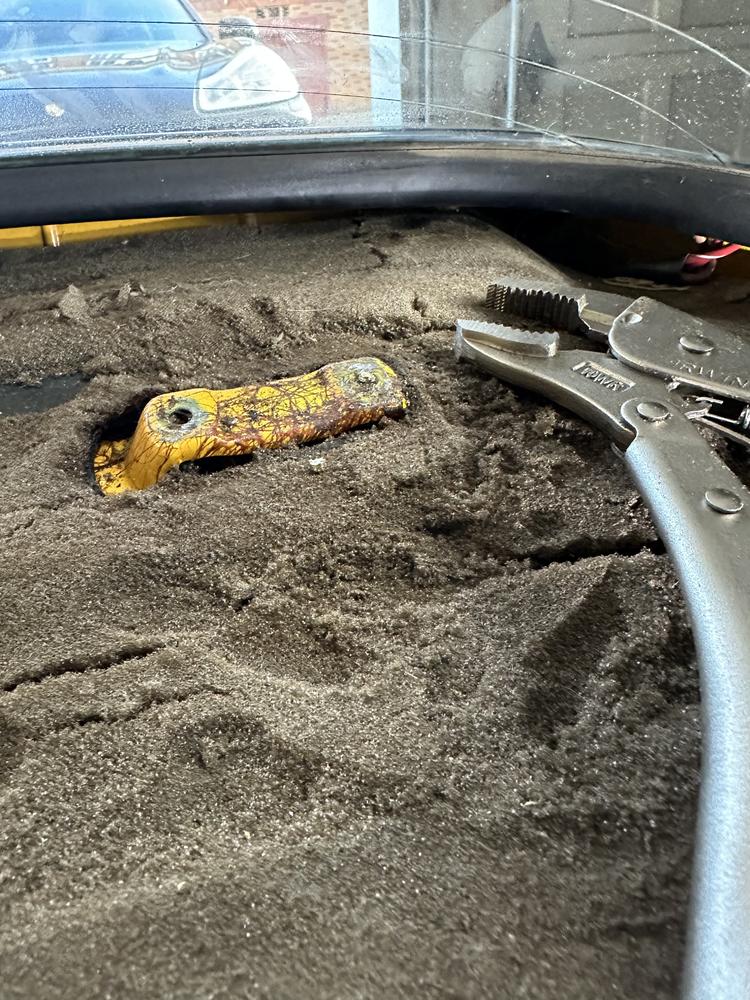
    Well, the 90 degree screwdriver worked, halfway!
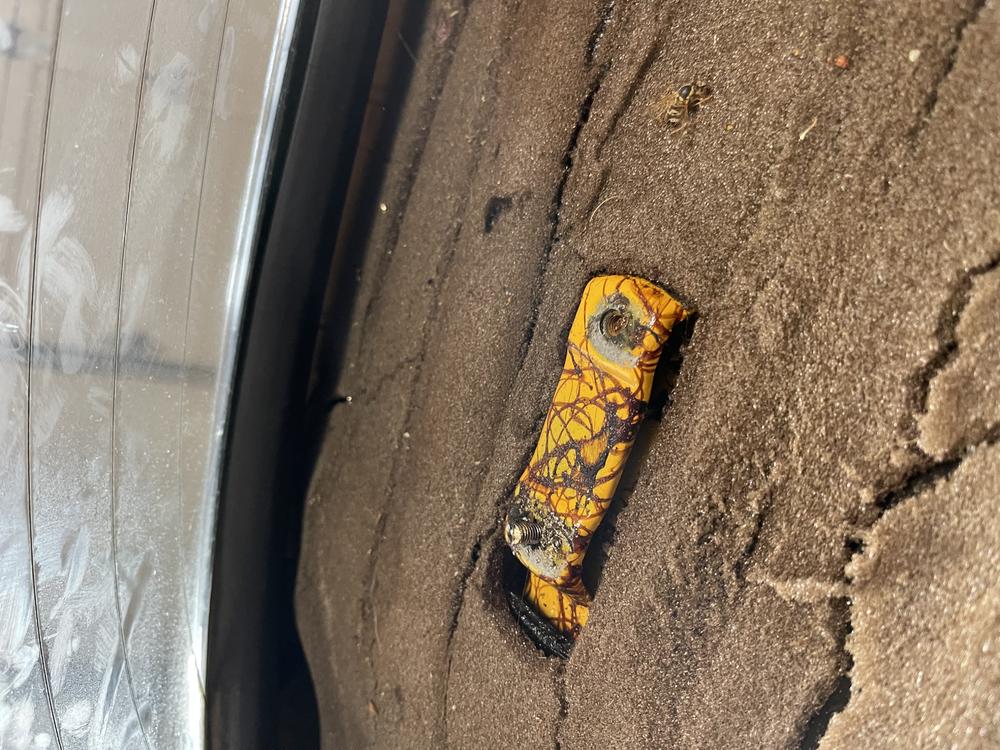
    One of the screws broke off, I guess over time rust from moisture weakened the metal. The other screw stripped. I tried to use a spin it out tool to remove it but that failed as well so I just broke the top off.
    Any smart ways to get to the 2 broken screws without removing the rear glass? Given the angle I can’t get the drill bit to screw in the screw extractor

    Name:  424A3296-46EC-4499-B7FE-1A25903EEF8C.jpg
Views: 279
Size:  133.3 KB

    Name:  7DDF42C3-259B-4363-99A4-88CBEAD20462.jpg
Views: 291
Size:  126.8 KB

    Name:  52B67A33-C7BC-4B91-9477-46B2723679CE.jpg
Views: 280
Size:  156.0 KB

  4. #14
    Senior Member bob joyce's Avatar
    Join Date
    Aug 2017
    Location
    el sobrante ca.
    Posts
    1,165
    first mask/protect the glass
    with a Dremel or die grinder grind the screws down flat
    then with a 90 degree drill the screw
    then run a tap
    have a beer
    if you can't rig up a 90-degree drill.
    there are Dremel attachments and grinding bits that you can hog out the screw enough to get a tap in and rethread
    than have two beers...........

  5. #15
    Senior Member
    Join Date
    Sep 2018
    Location
    Northern California
    Posts
    312
    Quote Originally Posted by bob joyce View Post
    first mask/protect the glass
    with a Dremel or die grinder grind the screws down flat
    then with a 90 degree drill the screw
    then run a tap
    have a beer
    if you can't rig up a 90-degree drill.
    there are Dremel attachments and grinding bits that you can hog out the screw enough to get a tap in and rethread
    than have two beers...........
    Sounds lovely….
    Is it necessary to dremel the screw down before tapping? I don’t have the equipment to grind unfortunately…

  6. #16
    Senior Member ejboyd5's Avatar
    Join Date
    Dec 2010
    Location
    Southold, NY
    Posts
    821
    Are you going to use the brackets or are they for show. If the latter, glue them back in place and move on.

  7. #17
    Senior Member
    Join Date
    Sep 2018
    Location
    Northern California
    Posts
    312
    “For show” but as far as I could tell they also held the rear parcel shelf in place? The bottom screws weren’t really fastening it anymore.

  8. #18
    Senior Member mathieulecomte's Avatar
    Join Date
    Dec 2016
    Location
    New Jersey
    Posts
    330
    I would make a slot in your remaining screw with a dremel, loads of Kroil to penetrate and work the screw back in and out a few times to remove/get by the rust. You can retap easily, I did that to mine recently.

  9. #19
    Senior Member
    Join Date
    Sep 2018
    Location
    Northern California
    Posts
    312
    Well the good news is I got the passenger side screw out with a vise grip. The driver side unfortunately didn’t protrude far enough and I twisted the top off so I’ll have to see if I can drill it out.Name:  E393A780-4302-4378-892F-F1F9A1A93AF0.jpg
Views: 178
Size:  172.5 KB
    Name:  B63650DE-CE45-43DD-8A5B-07C02C3F62EF.jpg
Views: 165
Size:  186.2 KB

  10. #20
    At that point the critical step is to carefully center punch the broken screw and you must be centered in the screw, then using a right angle drill motor start with small drill bits, the first small hole will show you if you are centered in the broken screw, assuming you are just keep stepping up your drill bit size until you get to the tap drill size, and if you were centered you can now tap out remaining screw bits with the correct size tap. ,,,,,Just a normal day at work.
    Early S Registry member #90
    R Gruppe member #138
    Fort Worth Tx.

Posting Permissions

  • You may not post new threads
  • You may not post replies
  • You may not post attachments
  • You may not edit your posts
  •  

Message Board Disclaimer and Terms of Use
This is a public forum. Messages posted here can be viewed by the public. The Early 911S Registry is not responsible for messages posted in its online forums, and any message will express the views of the author and not the Early 911S Registry. Use of online forums shall constitute the agreement of the user not to post anything of religious or political content, false and defamatory, inaccurate, abusive, vulgar, hateful, harassing, obscene, profane, sexually oriented, threatening, invasive of a person's privacy, or otherwise to violate the law and the further agreement of the user to be solely responsible for and hold the Early 911S Registry harmless in the event of any claim based on their message. Any viewer who finds a message objectionable should contact us immediately by email. The Early 911S Registry has the ability to remove objectionable messages and we will make every effort to do so, within a reasonable time frame, if we determine that removal is necessary.