
I havent found a thread on re-installing the door pockets.
is there such a tech thread out there?
any input appreciated...thanks


I havent found a thread on re-installing the door pockets.
is there such a tech thread out there?
any input appreciated...thanks
Richard aka le Zookeeper
early reg #1128
I've done it on 69-73 cars...what's the question?
I, too have done this numerous times. Happy to help, but tell me what you need help with.
All the best
John
Early 911 S Registry member 473
RGruppe member 445
69-73 well I have only dis-assembled warped and mickey moused assemblies if they were there at all and never re-installed these on 69-73 cars.
I have acquired some nice pockets and didnt find a diagram showing the order of assembly assuming the parts I am re-using are not bent.
The long pocket is mainly the one I would like to see strait and closing as it should, the ones I am replacing never closed good or were screwed shut.
I figured out the bracket with the tongue, (looks bent) where it mounts, so I gather the bracket goes in first, then the door panel....and then forward pocket.
the rest is where precision guesswork or T&E comes in as all I found is a parts list... I know someone on here is a pocket pro
also the bungee question, how's it routed/attached?
thanks all, sorry I know its a no-brainer next time I'll try to find something more complex for you to help with.
Richard aka le Zookeeper
early reg #1128
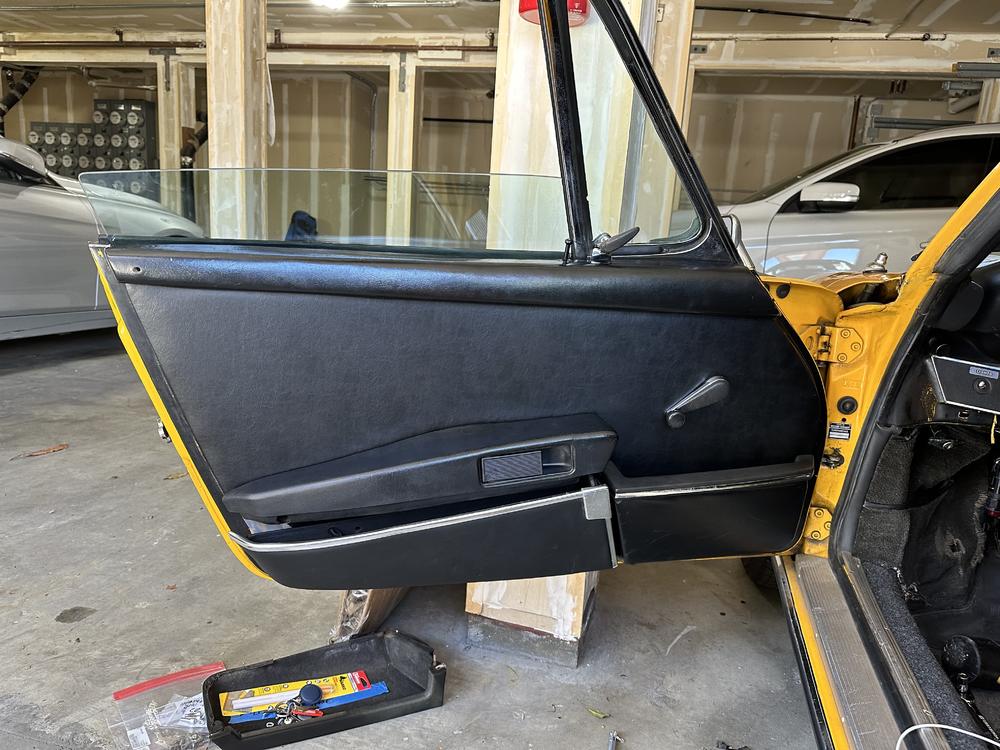
I restored all four of my door pockets and by far the hardest part of the job was reassembly. This is the order in which I reassembled my doors:
- Install door panel
- Install fixed map pocket
- Install pull-out door pocket
- Affix bungee cord
- Install arm rest
The door panel and fixed map pocket are pretty straight forward and install fairly easily. IIRC you need to install the fixed pocket before the pull-out pocket. The four screws holding the pull-out pocket are not easy to get a screwdriver on since the pocket needs to be close to the door (so the brackets to stay relatively flush), which allows the small screws to line up with the holes. If you fold the pocket down too far, then the pocket pushes on the door and won't allow the brackets to stay flush to the surface. I had to use a 90 degree screw driver and needed a lot of patience. As you work from front to back, the screw installation get progressively harder since you have less room to work with.
Once you get those installed, it is time for the bungee cord. Again I am going from memory here, but I think I looped the cord through the two forward holes, through the flange with round hole that is part of the door frame, and through the two rear holes. I tried it a couple of ways and this seemed to work the best. I would love to know the exact factory setup for this though. Anyway, you will also need a pair of vice grips or a clamp to help keep one end of the bungee in the pocket while you are working on the other. What I did was to pull one end of the cord into the pocket and clamp with vice grips. I then pulled the other end through and "threaded" it through the plastic retainers. That is a fun job too since the fit is tight and the bungee wants to expand when you try to thread it in. I used a pair of wire cutters and started with a clean end. Once you have that threaded properly, do the next end of the cord. Pull them both to tighten up the fit and you are done. Bear in mind that words make this sound easy, but it can be a very frustrating job at times and requires patience.
The last thing I did was to install the arm rest. I did this last so I would have ample room to work with the bungee cord, but I have reinstalled the cord with the arm rest in place. Now that is a bitch and will definitely test your patience. The hardest part of the arm rest install was to get that plastic snap on "knuckle" snapped onto the door latch mechanism. Again, requires a ton of patience since you have very little room to work and can't see sh1t. I carefully used a pair of needlenose pliers to squeeze it on. Takes a while, so if anyone has a better suggestion, I am all ears.
That is how I did it and am open to any critiques to making this job a whole lot easier. I am still not 100% satisfied that my pockets fit as tight as I would like. They are a whole lot better than when I got the car (screwed in), but I know they can be better. I love the look of the pockets when they are in great shape and fit tight, but quite frankly, I think they are a real bitch to maintain and keep nice long term.
Hope this helps. Good luck.
Scott H.
1969 Coupe LtWt
1973.5 911T
Should have put the arm rest back on 2nd last and bungee last as the bungee is supposed to go through the metal attachment to the arm rest....well thats how I have seen it on unmolested cars previously and thats how I have done it 6 or so times.
Clyde Boyer
1973 2.4E Coupe RHD Aussie 5 speed
1973 2.4E Coupe RHD Aussie 5 speed my first ever 911 (1995)
Early S Registry Member #294
First Aussie R Gruppe Member #366
TYP 901 Register Inc #6
Check pelican BBS for a good tutorial on how to do this correctly. I can never get bungee installed and still have tension on it when door is closed.
Good Luck,
Phil
Realize Im resurrecting an old thread but these were the best instructions I found which I used as reference todayOriginally Posted by t6dpilot

I'm sorry I can't give you specifics on doing it right. But that's not right. The far left tip is going to rip into the door rubber. And obviously the arm rest and pocket are not lining up like they should. Hopefully someone can give more guidance. Maybe that's not a factory door? Or the body has warped, so it won't fit right anymore?
Push the pocket against the door handle and see if it conforms to it, if it doesn't you'll have to fix that first.
The design of these pockets was assigned to a very junior intern at the factory by the name of R. Goldberg.
I spent ten years fiddling with these things in a hot humid climate with little enduring success. The bungee cord gives out, the pocket warps, the silver trim pops off etc.etc. I finally committed the sin of mounting 74 door pockets made of thermoplastic, (not fibreglass, those warp too), that are produced by a very innovative fellow in Florida Lincoln Interiors or something like that. Never a problem since then. Heresy I know, but practical. I think he sells on Ebay now.
Another benefit is that you gain a door handle to close the door with instead of having to pull the fixed pocket.
David
'73 S Targa #0830 2.7 MFI rebuilt to RS specs
 Posting Permissions

 Reply With Quote