Page 1 of 2 12 LastLast
Results 1 to 10 of 15

Thread: How I recovered my leather 380mm steering wheel....

  1. #1

    How I recovered my leather 380mm steering wheel....

    ….techniques and lessons learned.

    I decided to try to recover my 380mm four spoke steering wheel from my '69 911T. I love a challenge. It's probably worth the money to pay someone to do it, but if you have time on your hands and get a satisfaction of doing something yourself you should try a DIY steering wheel recover.
    First of all, you do not need to buy a “kit”. You can get all the necessary materials and tools yourself. The following is how I did it. You might have your own techniques and methods. Please post them here for others to use.
    I bought the black leather on Itsy.com. I bought half a hide for only $35. It was slightly thicker than the original steering wheel leather. I used a heavy waxed thread that I bought on mainethread.com. I also used a thinner upholstery Dacron thread to stitch the ends together. You will need the following tools:

    Straight edge / carpenters square
    Circle template
    Single edged razor blades
    X-Acto Knife
    Skiving tool – bought on Ebay, used to taper the ends of the leather, so when you fold the leather over, it's not too thick
    Scissors
    Fabric marking pencil
    Curved needles
    Leather hole punch
    Hook tool – for hooking the thread as you lace and pulling it tight.
    Masking/painters tape – don't use a tape that will pull the finish off the leather
    Digital calipers – very helpful
    Contact cement
    Name:  tools.jpg
Views: 913
Size:  88.1 KB
    Before you remove the cover note the stitching patterns. Mine had a XXXXX pattern around the rim and a baseball >>>>> stitch on the spokes. Note the leather extends onto the metal spokes. Carefully remove the steering wheel cover. Note inside of the seam and the end of the spokes. That is where the skiving tool is use to taper the leather before it is folded over and glued. The old leather is practically useless as a pattern for making a new cover. Note that the leather tapers slightly as the ends of the spokes. I made a paper pattern only to find the spacing of the spokes.
    Next, I cut leather pieces to test the width that I needed to cut the cover and to practice stitching. All leather will be different thicknesses and will have different stretch properties, so you will have to determine how wide to cut your cover. My first test piece was 65mm wide and about 100mm long. I found that it took a lot of pull to close the gap on the seam, so I went with 66mm. That extra 1mm made all the difference on how the leather came together properly. I also cut a long test piece (long enough to go along a spoke on the front side around to the backside. I practiced my baseball stitch and found that 35mm was a good width for the spokes. I'll discuss how to do the stitching a little later so reference that section to practice your stitching.
    I next cut the leather cover. I used the fabric pencil to lightly mark my cuts. I referenced my paper pattern to mark where the spokes align. When you cut the cover, cut the spokes EXTRA wide. Why? Because you are going to make the cover about 1 to 1.25cm smaller in diameter than the steering wheel so it will stretch tight when you mount it. Your spoke measurements will shift. Also the spokes are not exactly perpendicular to the wheel rim. I cut the spokes to width after I sewed the ends together. Remember to leave some extra leather on the ends where you will sew the ends together. I used a carpenters square to make the lengthwise cuts. Cut one side, then carefully measure (I used my digital caliper) and align your straight edge so it is EXACTLY parallel to your first cut and exactly 66mm wide (or whatever width that works for your leather). After the cover has been cut out, use the skiving tool and taper each end. Next, sew the ends together. Smooth side to the inside. I used a leather punch and punched holes across the width and hand sewed this seam using the thinner Dacron upholstery thread. If you have a heavy duty sewing machine use it to sew this seam. Next take a block of wood and use the edge to run it along the back side of the seam. Doing this will help fold over the ends. Use contact cement and glue down the tapered ends. You should have a nice tight and fairly flat seam.
    Now we will trim the leather spokes to width. Leave the leather spoke lengths LONG at the point. Put masking tape on the backside of each of the four leather spokes. Put the cover on the steering wheel starting with your seam exactly at the bottom of the wheel. You will see the old imprint of the seam. It should be a fairly tight fit. Make sure the leather is evenly stretched on the wheel and centered side to side. Now make a few tick marks on the masking tape along the center of each leather spoke, front and back. Now take the cover off, turn it back side out. The masking tape will be to the outside and you should have the exact centers marked. Use a straight edge and connect your tick marks. You will notice that the spokes are not exactly perpendicular to the outside wheel and your marks will show this. Using the center lines, I marked my widths. (I used 35mm, your measurements might be different.) Next I trimmed the spokes to width. Again, do not cut the length. Leave them long. Note that the corners of each spoke is a radius, not a right angle. I used my Xacto knife and a circle template to cut the radius. Pull off all the masking tape.
    Next, turn your cover right side out. You will now pre-punch all of the holes except along the spokes. I had a straight edge with metric markings. I went with a 5mm spacing. That spacing is slightly smaller than original, but is easier to measure. I had a long board about a foot wide and laid it on the kitchen table, sticking out towards me. Lay your cover around this board and start punching holes, starting either side of the bottom seam. First do one edge, then the opposite edge. Make sure the holes line up with each other exactly from side to side. i.e. don't have 30 holes on one side and 31 on the other. Haha. I used a square to make sure the holes lined up. So now all four sections should be punched. (top, bottom, and between spokes, but not along the spokes.)
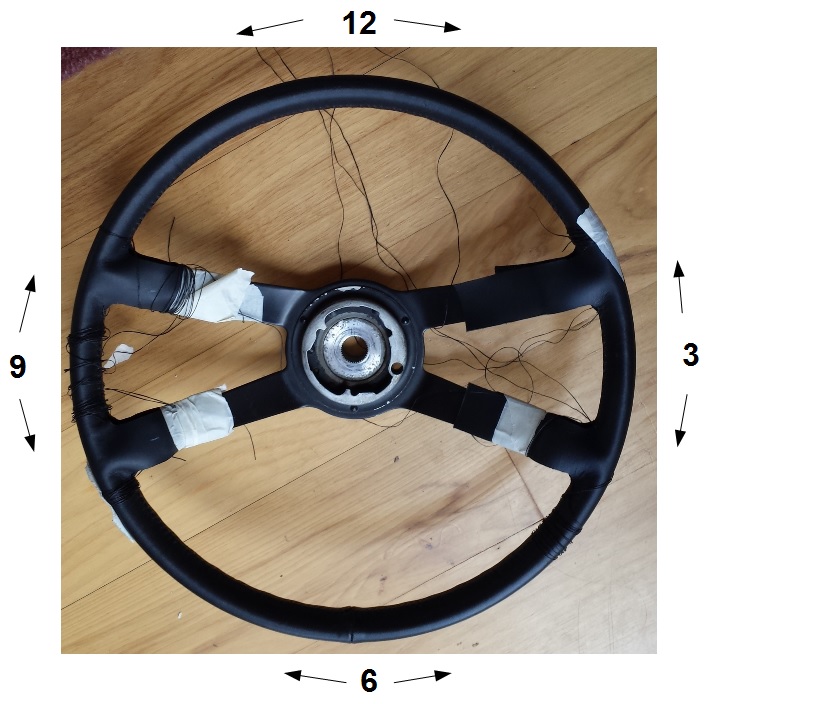
    Now comes the fun part – the stitching. Put some contact cement on the inside of your seam and on the bottom of your steering wheel. Line up the cover seam with the bottom of your steering wheel, centered side to side and put the cover back on the wheel. Again make sure the cover is evenly stretched and the leather cover spokes EXACTLY line up with the steering wheel spokes. You can put some contact cement along the wheel and cover. 10 and 2 o'clock and 4 and 8 o'clock positions. Don't over do it. Use masking tape at these points and at the spokes to hold the cover in position. You will use FOUR start points for the stitching: the 12, 3, 6, and 9 o'clock positions. At each position you will stitch counterclockwise and clockwise, so you will have EIGHT threads running around the steering wheel terminating along the spokes. WHAT?? Trust me on this.
    Name:  Start Points.jpg
Views: 1009
Size:  137.8 KB
    Attached Images Attached Images    

  2. #2
    The threads for the 12 and 6 o'clock positions need to be TWO arms-stretched length long,(about 2 meters) so cut FOUR of these. The threads for the 3 and 9 o'clock positions need to be only ONE arm-stretched length long (about 1 meter) so cut FOUR of these.

    This is how to do a cross stitch. Take one of the long threads. Thread the curved needles on each end. Take one of the needles and go DOWN through hole 1, straight across and UP through hole 2.
    Now you have an end coming up out of holes 1 and 2.
    Take your right needle across to hole 3 and go DOWN through hole 3, across, and UP through hole 4. Take your left needle across to hole 4 and go DOWN through hole 4, across, and UP through hole 3. Now you have an ends coming up out of holes 3 and 4.
    Take your right needle across to hole 5 and go DOWN through hole 5, across, UP through hole 6.
    Take your left needle across to hole 6 and go DOWN through hole 6, across, and UP through hole 5. Now you have an ends coming up out of holes 5 and 6. Repeat over and over and over....


    5* *6

    3* *4

    1* *2 Starting Position

    Take another long thread, thread two needles on each end and thread it through the same start point holes 1 and 2. Do the exact same pattern going the opposite direction. After 4 or 5 sets of holes are laced in each direction, pull the thread snug and now use you the hook tool to pull the threads tighter. Keep working the thread tighter and tighter with the tool until the leather starts to close up. Lace some more holes in each direction away from the starting point, and again pull the thread tight and close up the seam with the hook tool. After you get a number of holes laced and pulled tight the wax on the thread will help hold the seam together. SOME TIPS: Wrap some masking tape around the wheel rim a few inches from where you are working the holes. After you lace a set of holes hand pull the ends snug back towards the starting point. This will help keep the leather cover from shifting as you stitch. You do not want to reach the spokes with the leather shifted and the spoke leather misaligned with the steering wheel spokes. Also when you cross under, and up through a hole make sure you do not thread your needle through the thread already in that hole. If you do, when you snug up the thread and pull it tight the thread will rip. Also, it is very important to ALWAYS cross the same thread over the other. i.e. the left thread always goes over the right thread. This will make a difference on how the stitching looks.
    I started the 6 o'clock position, where the seam is, a little differently. Picture the seam in the above diagram running between holes 1 and 3 and 2 and 4. I started one thread in holes 1 and 2 as previously described and the second thread in holes 3 and 4 going in the opposite direction. This made a doubled X stitch over the seam. I needed the doubled thread to pull the extra thick seam tight.
    Stitch the seam to each spoke and stop there. I wrapped the thread that I wasn't working with around the wheel and taped it out of the way. Now we cut the spoke leather to length. Push the leather along the contour of the spoke. Remember the leather goes beyond the rubber spoke on onto the metal portion of the spoke. Add a little extra length to be folded under. Mark and cut to length. Do this for all four spokes. Get someone to hold the wheel upright while you use the skiving tool to taper the leather on the spokes ends. Put contact cement on the leather spoke ends, let dry and fold over the leather ends. You will notice that where the spokes meet the rim of the wheel the contour is concave. You will have to glue that section of leather down. While you are applying cement, extend it midway down the rubber spoke. Let it get tacky and then press down and hold it in place with your fingers.
    Now you can continue to stitch up the spokes. The stitch changes to a baseball “>>>>” stitch. I did not pre-punch holes along the spokes. I was able to push the needle through the raw leather, but boy my fingers were hurting! These holes where closer together than the cross stitched sections. Look at the original cover. Look at the above hole diagram. If you picture the base of the spokes as the starting position holes 1 and 2. The left thread will be coming up out of hole 1 and the right thread up out of hole 2. Take your right needle across to hole 3 but come UP through the bottom of hole 3 Take your left needle across to hole 4 but come UP through the bottom of hole 4. Now take your right needle across to hole 5 and come UP through hole 5. Take your left needle across to hole 6 and come UP through hole 6. You can see in this stitch, the needle always goes UP through the holes after a crossover. Work a few sets of holes and start snugging the thread. Use the hook tool. Work both sides of the spoke at the same time, alternating one side then the other. When I get to the end of the spokes the thread ends will be coming UP through the last holes. Before you snug everything down put some contact cement on the leather ends and spokes and glue it down. Take your right needle and go directly across the the adjacent hole and go DOWN through it. Take your left needle and go directly across and go DOWN through that hole. Now the threads will be coming out of the bottom of the last holes. This is your last chance to work your threads tight and to get all your seams tight. Take your time and work it tight. Put a couple of half hitch knots in your threads. Pull the two threads to the backside of the spoke. Cut them about Ύ long and tuck them in the back. Use a took pick and some more contact cement to tuck them in.

    Do all the spokes and you are done!

  3. #3
    nemo me impune lacessit Kris Clewell's Avatar
    Join Date
    Oct 2012
    Location
    Minneapolis
    Posts
    2,045
    cool write up man! I wish I felt confident enough to do this!
    -Kris Clewell

    Professional photojournalist

    red decklid club member #1

  4. #4
    You can do it! It just takes some time. I had never worked with leather. I took a lot a time thinking how I wanted to approach it. Most of the time was spent measuring and cutting the new cover. Once you cut everything out, you can do a little at a time. I did a lot of the stitching just watching TV. I figured if I got over my head, I could just send it off and have it done. To be honest, I messed up 2 covers. I used them as learning experiences. Can you imagine the people in Germany that had to cover thousands of these steering wheels?

  5. #5
    Senior Member
    Join Date
    Jun 2014
    Location
    San Clemente, CA
    Posts
    106
    Great report. Thanks for posting.

  6. #6
    Senior Member 62S-R-S's Avatar
    Join Date
    Nov 2009
    Location
    Cecil pa
    Posts
    863
    What a great result.. When I tried it, I chose a thicker leather which brings some headaches. To pull the needle through was a labor intensive thing and pliers were needed. I can't imagine doing that cross stitch business.

    Deertan is a soft type of 1/8" leather.. More than two weeks into it before it was done..
    Attached Images Attached Images   
    Last edited by 62S-R-S; 04-07-2015 at 04:26 AM.

  7. #7
    Thanks much for the detailed instructions - how long did it take?

  8. #8
    I really couldn't tell you the total time. I would work on it then put it down, then do a little the next day. I would say maybe 8 hours of solid work. A couple of hours just to measure, cut it out, punch holes and sew it together. The rest just stitching it on.

  9. #9
    not nearly as bad as I feared!

  10. #10
    Senior Member
    Join Date
    Jul 2011
    Location
    Chicago Area
    Posts
    5,440
    My brain froze halfway through this post. Even the pictures give me nightmares. 911T1969 what is your employment background?
    Mike Fitton # 2071
    2018 911S Carrera White
    2012 991 Platinum Silver ( Gone)
    1971 911T Targa Bahia Red (Gone to France)
    1995 911 Carrera Polar Silver (Gone)

    No Affiliation with City of Chicago!

Posting Permissions

  • You may not post new threads
  • You may not post replies
  • You may not post attachments
  • You may not edit your posts
  •  

Message Board Disclaimer and Terms of Use
This is a public forum. Messages posted here can be viewed by the public. The Early 911S Registry is not responsible for messages posted in its online forums, and any message will express the views of the author and not the Early 911S Registry. Use of online forums shall constitute the agreement of the user not to post anything of religious or political content, false and defamatory, inaccurate, abusive, vulgar, hateful, harassing, obscene, profane, sexually oriented, threatening, invasive of a person's privacy, or otherwise to violate the law and the further agreement of the user to be solely responsible for and hold the Early 911S Registry harmless in the event of any claim based on their message. Any viewer who finds a message objectionable should contact us immediately by email. The Early 911S Registry has the ability to remove objectionable messages and we will make every effort to do so, within a reasonable time frame, if we determine that removal is necessary.